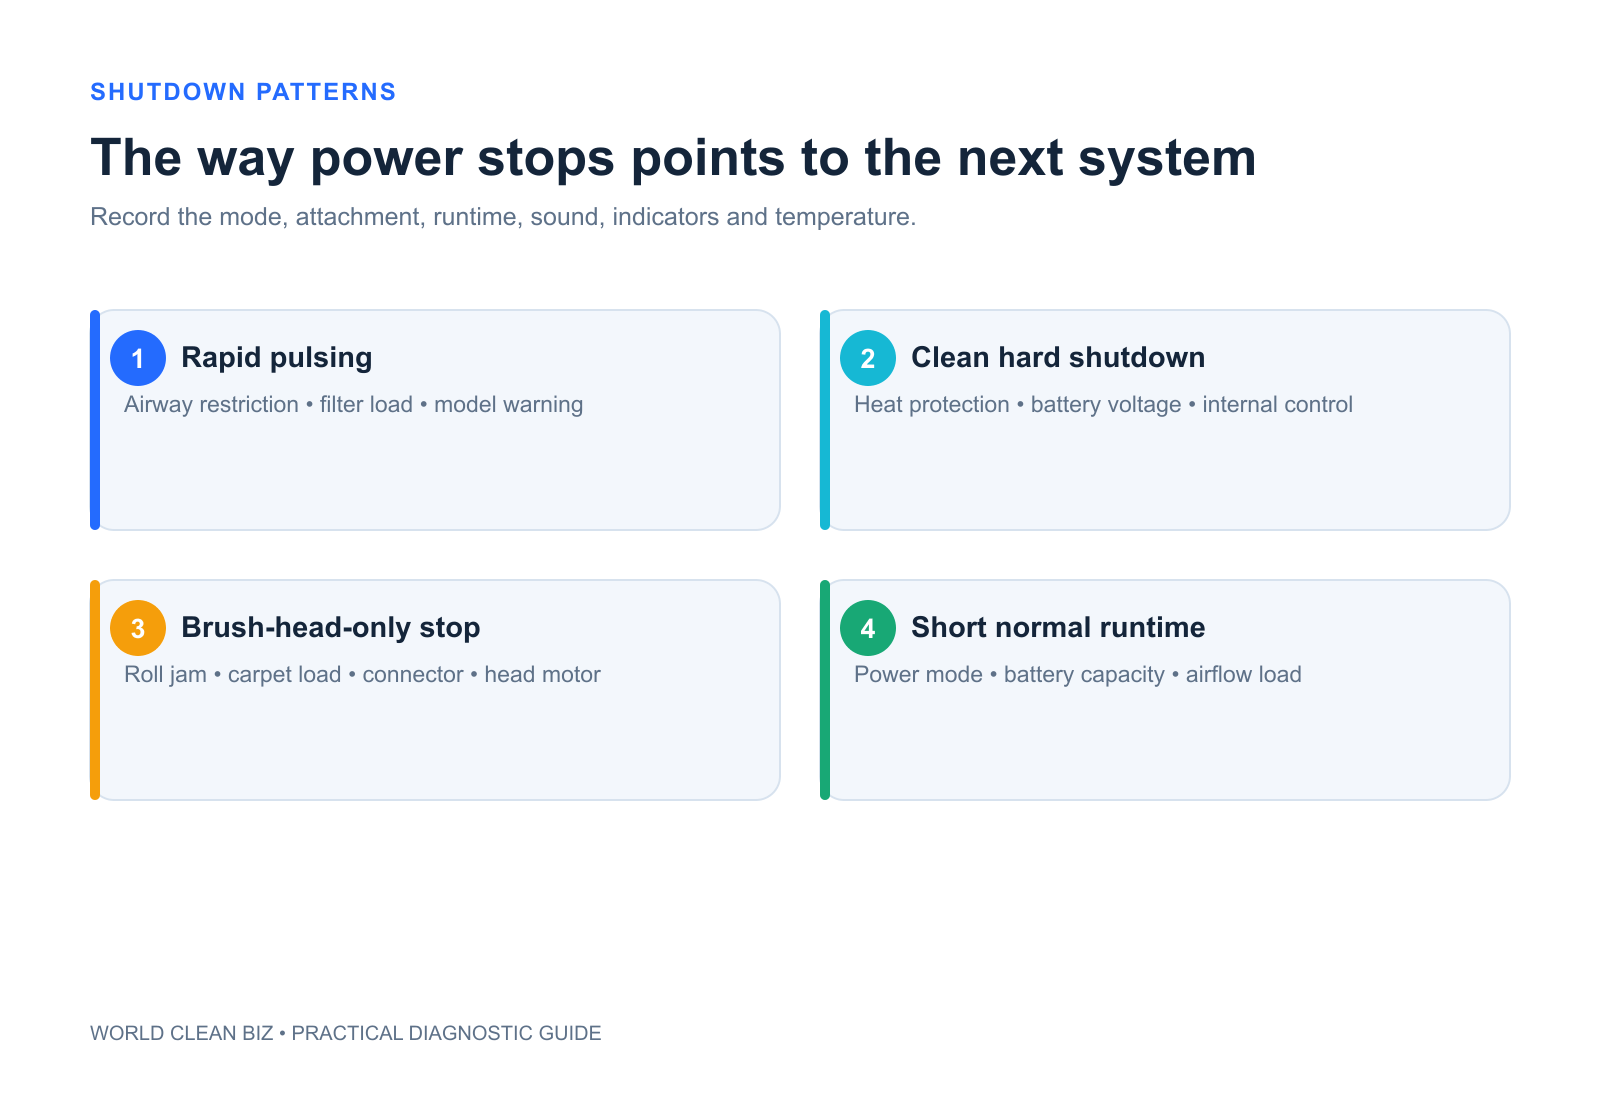
- Distinguish rapid pulsing, a clean hard shutdown, brush-head-only stopping and short battery runtime; they point to different systems.
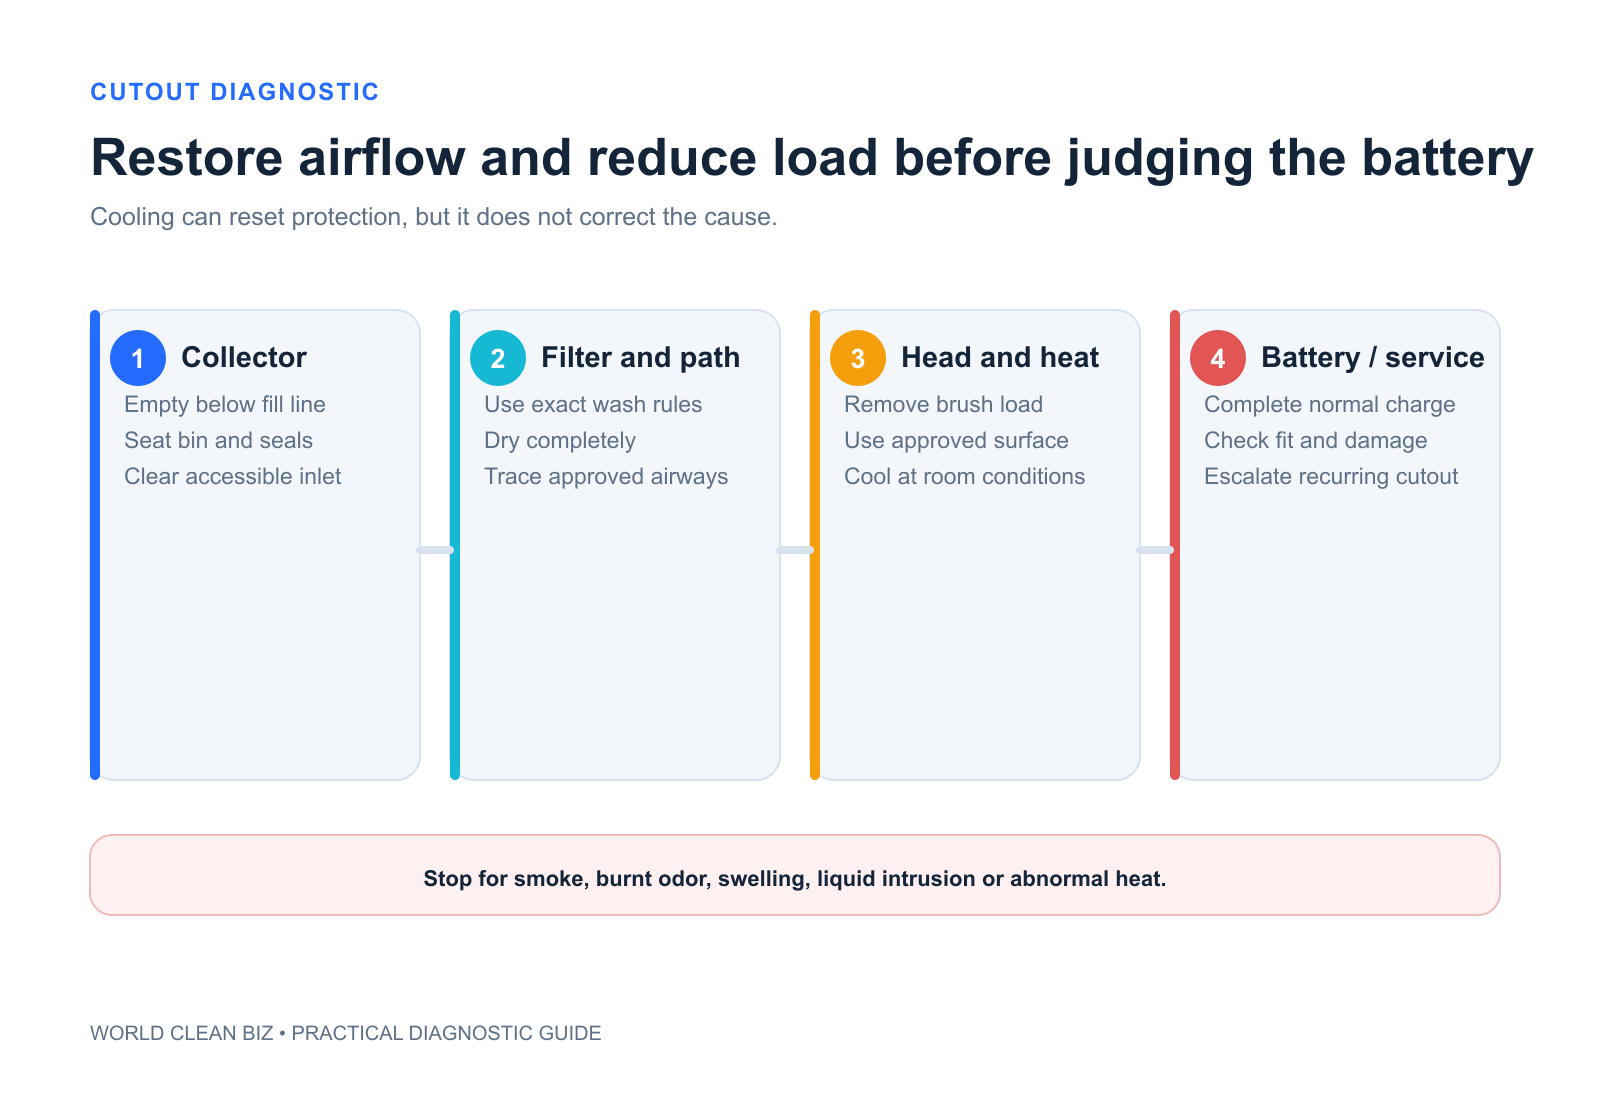
- Empty the collector, check the exact washable-filter rules and trace accessible blockages before assuming the battery or motor has failed.
- Repeated overheating, burnt odor, battery damage, liquid intrusion or shutdown after the approved airflow path is clear requires authorized service.
In this article 16 sections
If your cordless vacuum keeps shutting off, first identify the pattern. Rapid pulsing often points toward restricted airflow or a model warning. A clean shutdown after several minutes can involve heat protection, battery capacity or electrical load. If only the powered floorhead stops, check the brush and attachment path. Empty the bin, maintain filters exactly as instructed and inspect accessible blockages before suspecting the battery, motor or controller.
Do not keep pulling the trigger through repeated cutouts. A protection system is evidence to diagnose, not an obstacle to bypass.
Cordless Vacuum Shutdown Patterns
| What you observe | Leading area | First safe action |
|---|---|---|
| Motor pulses rapidly | Airway blockage, filter restriction or warning state | Switch off and trace the approved airflow path |
| Runs briefly, then stops | Heat, battery voltage drop or heavy load | Record runtime, mode and temperature |
| Stops only with floorhead attached | Brush jam, head motor, connector or blocked nozzle | Isolate and inspect the powered head |
| Stops in boost but runs in normal mode | Battery condition, heat or load | Fully charge and compare modes after maintenance |
| Restarts after cooling | Thermal protection or heat-sensitive fault | Correct airflow and load before retesting |
| Cuts out when the wand moves | Connection, trigger, wiring or battery latch | Stop movement tests and inspect accessible fit |
| Burnt smell, smoke or battery heat | Electrical, motor, charger or battery fault | Stop immediately and use service |
Stop for Safety Before Troubleshooting
Switch the vacuum off and remove it from the charger before accessing the bin, filter, wand or floorhead. Remove the battery only if the exact instructions permit it.
Stop using the machine for:
- smoke, sparks, burnt odor or melting;
- a swollen, cracked, leaking or unusually hot battery;
- a damaged charger, plug, cable, trigger or battery latch;
- liquid in a dry-only vacuum;
- repeated severe heat after airflow maintenance;
- exposed wiring or an internal rattle after impact.
Do not open a battery pack, motor or sealed powered head. Do not defeat temperature, blockage or interlock protection.
1. Distinguish Pulsing from a Full Shutdown
“Keeps stopping” can describe several behaviors:
- Pulsing: the motor switches on and off quickly while the trigger remains held.
- Hard shutdown: power stops cleanly and indicators may go dark or show an alert.
- Brush-only stop: suction continues but the floorhead roll stops.
- Short runtime: the vacuum operates normally but reaches empty battery much sooner than expected.
- Intermittent connection: movement of the wand, battery or trigger changes power.
Film the indicator and sound if it can be done safely. Record the exact mode, attachment, runtime and whether the machine was recently charged.
Dyson's V11 support separates cutting out or pulsing from charging and low-suction symptoms. Its common user checks include blockages, filter and cyclone maintenance, but the detailed sequence remains model-specific.
2. Empty the Bin and Check the Cyclone or Screen
A collector at or above its fill line can restrict airflow and push fine dust into screens and filters. Empty it using the approved method and confirm that the bin, lid and seals are fully reassembled.
Inspect accessible areas for:
- packed debris around the inlet;
- fine dust coating a mesh or shroud;
- a flap that cannot open or close;
- a bin that is not latched;
- a damaged seal;
- damp debris in a dry-only machine.
Do not wash a cyclone, electrical main body or collector unless the manual explicitly permits it. A damp or incorrectly seated assembly can cause a new restriction.
3. Maintain Filters by Exact Model Rules
A loaded filter raises resistance and heat. However, filters differ: some are washable, some are replaced, and some vacuum models use more than one element.
Confirm:
- which filters are user-accessible;
- whether each one is washable;
- the approved cleaning method;
- the required drying time;
- correct orientation and locking position;
- replacement condition or interval.
Dyson's Digital Slim support instructs owners to wash the model's filter and leave it for at least 24 hours with good airflow before refitting. That timing is not universal. Never reinstall any washed filter until it is fully dry under the exact product guidance.
4. Trace Accessible Blockages
Check the air path in order so that the location of the restriction remains clear:
- floorhead intake and neck;
- brush chamber;
- wand or extension tube;
- accessory tool;
- collector inlet;
- approved cyclone or filter entrances.
Large items can lodge at a bend while distributed fine dust loads a filter without one obvious clog. Use only the provided tool or method. Sharp rods can puncture a hose, damage a seal or reach moving components.
Dyson's model troubleshooting describes automatic cutout when a part is blocked or a filter needs washing and tells users to let the machine cool before blockage checks. WCB's vacuum losing suction guide provides a fuller airflow-isolation sequence.
5. Check the Brush and Powered Floorhead
If the vacuum stops only when the floorhead is connected, inspect:
- hair around the roll and end caps;
- a blocked nozzle or head neck;
- a brush that does not move as the manual expects;
- carpet or rug load;
- attachment pins and latches;
- warning lights on the head or vacuum.
A jammed brush motor can trigger local protection or increase total electrical load. Test only with the floorhead fully assembled on a safe approved surface. Do not energize an open head.
For the separate brush-drive diagnosis, use WCB's vacuum brush-roll guide.
6. Allow Proper Cooling — Then Fix the Cause
A vacuum that restarts after cooling may have triggered thermal protection, but cooling alone is not a repair. Before retesting, correct the leading heat source:
- blocked airflow;
- dirty or damp filter;
- full collector;
- jammed brush;
- prolonged maximum-power use outside the product guidance;
- hot storage or charging environment.
Place the machine on a stable, dry, ventilated surface and wait for the manufacturer-specified procedure or normal room conditions. Do not use ice, a refrigerator, water or forced heating.
If it overheats again with a clear air path, correct filters and approved load, stop use. A temperature sensor, motor, controller or battery may need service.
7. Separate Runtime Loss from a Cutout Fault
A battery near the end of its usable life may show full and then collapse under high load. But high-power mode also naturally provides less runtime, and a restricted vacuum draws greater load.
After airflow and floorhead checks:
- charge with the approved charger to the normal completed state;
- record the indicator before use;
- test the same approved attachment in normal mode;
- compare the failure time with boost mode only if necessary;
- observe whether the display falls gradually or power ends abruptly.
Dyson's V11 support identifies power mode, filter and cyclone condition, and battery replacement as separate contributors to short runtime. Tineco's LITEVAK FAQ likewise publishes model-specific runtime ranges and charging guidance rather than one category-wide figure.
If the vacuum does not reach a normal charged state, follow the separate cordless vacuum not-charging guide.
8. Inspect Battery Fit and External Connections
For a removable pack, confirm that the latch is fully engaged and the casing is undamaged. Check only accessible clean contact surfaces using the approved method. A loose battery that disconnects as the vacuum moves can imitate a motor fault.
Also inspect the wand and powered-head joints. If movement changes power, stop flexing the connection repeatedly. An internal wire, contact or latch can arc or worsen.
Do not shim a battery, tape a trigger down or bend contacts. Use only a verified replacement for the exact model and market.
9. Consider Trigger, Switch and Main-Body Faults
Once the collector, filter, airflow path, floorhead, charge and accessible connections are known good, an internal fault becomes more likely.
Service-level possibilities include:
- worn trigger or power switch;
- battery cell imbalance or battery-management fault;
- main-body contact failure;
- motor bearing or fan damage;
- controller or temperature-sensor fault;
- internal wiring damaged by movement or impact.
These cannot be distinguished safely by opening the vacuum at home. Preserve the model, serial number, video, indicator code, runtime, mode and maintenance result for support.
Verify the Correction
After approved maintenance and complete drying:
- reassemble the bin and filters correctly;
- install the charged approved battery;
- start with the simplest non-powered attachment if the manual permits;
- test normal mode before boost;
- add the wand and floorhead one stage at a time;
- stop if heat, odor, pulsing or cutout returns;
- record which stage reproduced the problem.
Changing one condition at a time creates useful service evidence and prevents a temporary reset from being mistaken for a repair.
When to Use Authorized Service
Use service when the vacuum repeatedly shuts down after the accessible airflow path and filters are correct, or when the failure points toward the battery, trigger, motor, controller, wiring or powered connector.
Immediate service is required for battery damage, burnt odor, smoke, liquid intrusion, melting, arcing, severe recurring heat or a connection that cuts power when moved.
For product-development context around airflow, electronics and battery-system risks, see WCB's cordless vacuum OEM/ODM guide and hidden cordless-vacuum development risks.
FAQ
Why does my cordless vacuum pulse on and off?
Pulsing commonly signals restricted airflow or a model warning. Empty the collector, check approved filters and trace accessible blockages using the exact instructions.
Why does it stop only in boost mode?
Boost creates higher battery and thermal load. Battery condition, airflow restriction, temperature or a heavy powered tool can appear first in that mode.
Can a dirty filter make the vacuum shut off?
Yes. A loaded or damp filter can restrict airflow and increase heat. Clean, replace and dry it only as the model manual directs.
Why does suction keep running but the brush stops?
That points toward the floorhead mode, jam, brush drive, connector or local motor protection rather than a full main-body shutdown.
Should I keep restarting it after it cools?
No. Cooling may reset protection, but the cause still needs correction. Repeated heat after proper maintenance requires service.
Final Answer
When a cordless vacuum keeps shutting off, classify the failure as pulsing, hard cutout, brush-only stopping, short runtime or intermittent connection. Empty the bin, maintain filters exactly as specified, trace accessible blockages, inspect the powered head and let the machine cool normally before a controlled test.
If the cutout returns after airflow and load are corrected—or if there is battery damage, burnt odor, liquid intrusion or unusual heat—stop using the vacuum and arrange authorized service.
Official Sources
- Dyson V11 Support — Cutting Out, Charging and Runtime
- Dyson Troubleshooting — Automatic Cutout and Blockage
- Dyson Digital Slim Support — Filter Care
- Dyson No Power Support — Cord-Free Airway and Battery Checks
- Tineco LITEVAK FAQ — Runtime, Charging and Filter Care
- Shark Cordless Pro MultiFLEX Manual