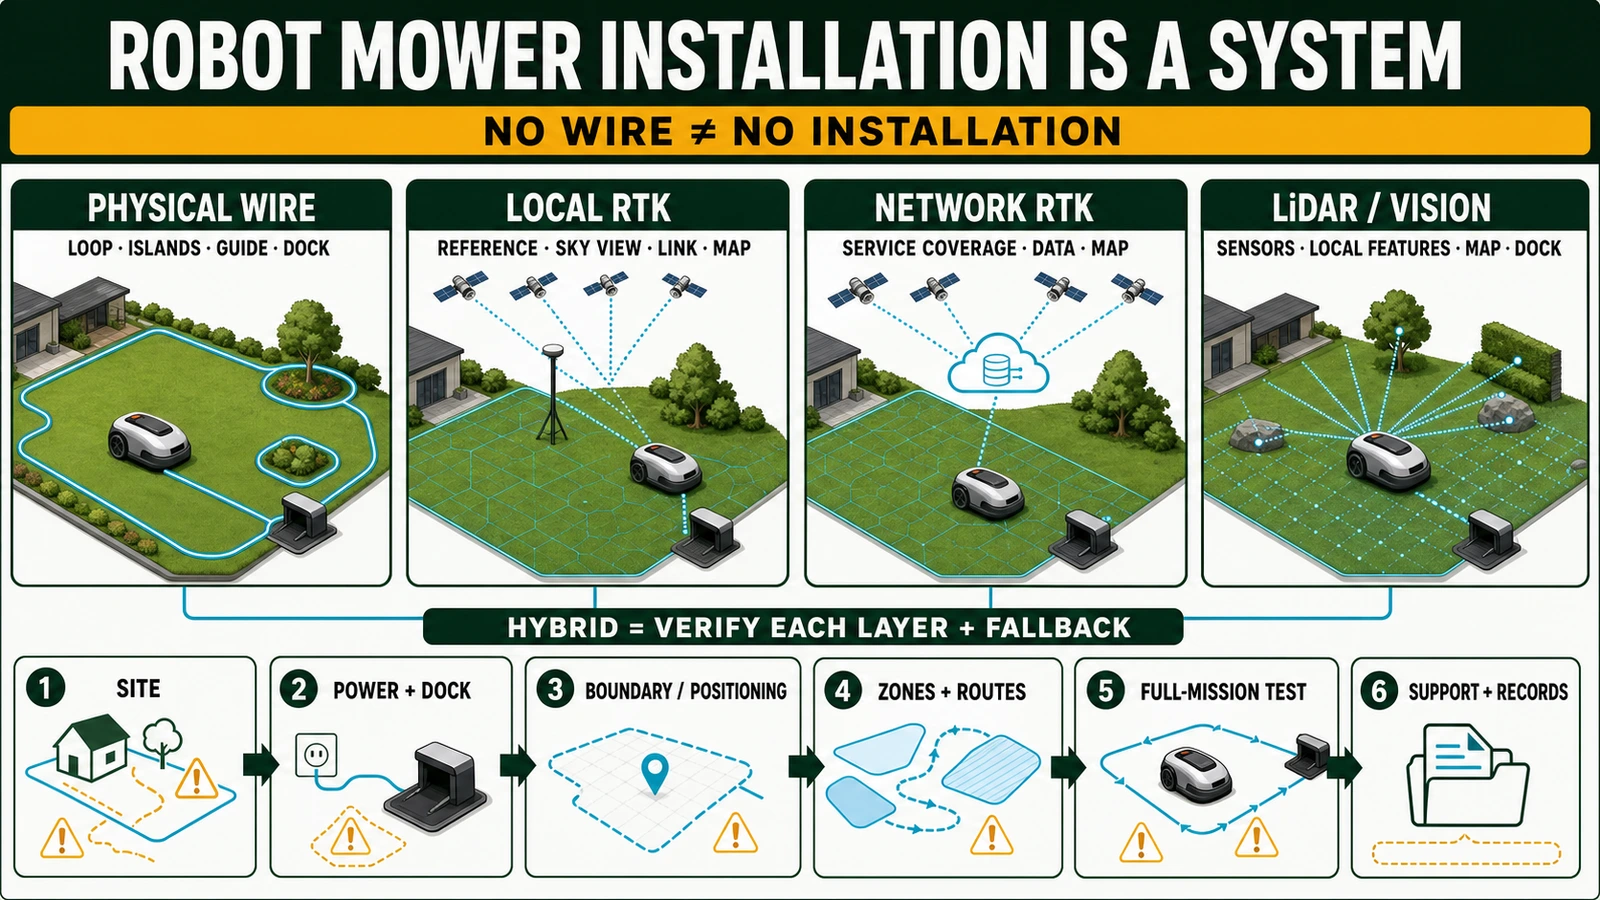
- Robot lawn mower installation is a site system, not a single setup task: it includes site qualification, power and docking, boundary or positioning infrastructure, mapping, commissioning and support.
- A wire-free mower still needs installation. Depending on the exact product, it may require a charging station, RTK reference station or correction service, connectivity, an App, digital maps and tested transport routes.
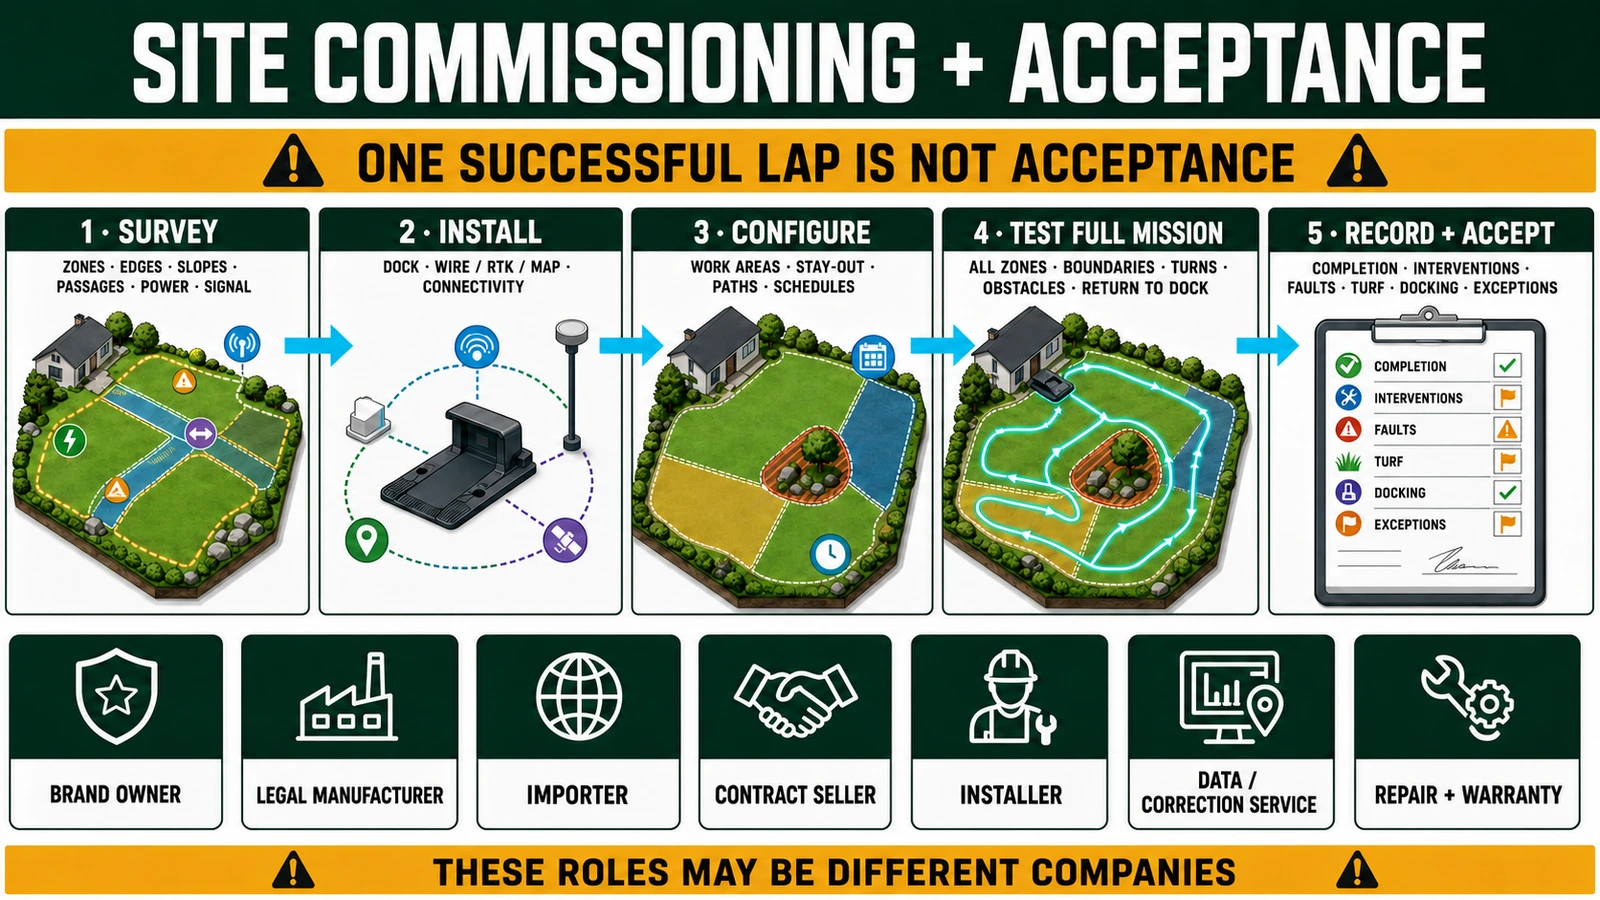
- Professional buyers should accept the complete mission—not one successful lap—and document every zone, boundary, passage, return-to-dock route, intervention, exception and responsible party.
In this article 16 sections
Robot lawn mower installation means more than switching on the machine. A complete installation qualifies the site, positions the charging and power system, installs a physical boundary or positioning infrastructure, creates work areas and routes, tests the complete mowing mission and records who is responsible for support. The exact process depends on whether the mower uses a boundary wire, RTK, Network RTK, LiDAR, vision or a hybrid system.
The most important correction is simple: no boundary wire does not mean no installation. A wire-free mower may still depend on a charging station, reference station, satellite-correction service, Wi-Fi or 4G, an App, a regional account, stored maps and software support.
A homeowner can use this guide to understand the project before opening the box. A distributor, dealer, installer, facility manager or landscaping operator should use it to define the installation scope, acceptance test and responsible parties before the order is signed.
For the underlying navigation technologies, see How Do Robot Lawn Mowers Work Without Boundary Wires?. This guide owns the next question: how should those systems be installed and accepted at a real site?
Robot Lawn Mower Installation at a Glance
| Installation architecture | What is installed or configured | What must be proven on site |
|---|---|---|
| Physical boundary wire | Charging station, powered loop, islands, connectors and model-dependent guide wires | Loop integrity, boundary behavior, passage access, route coverage and return to charge |
| Local RTK | Charging station, reference station, power, radio link, virtual map, zones and paths | Sky view, correction and communication coverage, map accuracy, weak-signal behavior and dock return |
| Network RTK or cloud corrections | Charging station, account, supported correction service, internet connection and virtual map | Service availability at the exact address, end-to-end connectivity, coverage gaps and recovery after interruption |
| LiDAR or vision-led mapping | Charging station, sensor preparation, App connection, map, no-go areas and routes | Local feature conditions, sensor visibility, map stability, obstacles, boundary behavior and docking |
| Hybrid system | The exact combination of wire, RTK, LiDAR, vision, inertial sensors or other aids | Which sensor owns each zone, how handover works and what the mower does when one layer degrades |
The distances, clearances, wire geometry, power requirements and map procedures are model-specific. A measurement taken from one brand’s video should not be reused for another product—or even for another series from the same brand.
What Does Robot Lawn Mower Installation Include?
A useful installation has six layers.
- Site qualification: confirm that the exact mower can handle the area, slopes, surface, passages, edges, obstacles and operating schedule.
- Power and docking: provide the approved electrical arrangement and position the charging station for access, drainage, alignment, navigation and maintenance.
- Boundary or positioning infrastructure: install the physical loop, reference station, correction service or sensor-led mapping environment used by the exact product.
- Digital configuration: pair the mower, update approved firmware where required, create work areas, stay-out zones, transport paths, docking or maintenance points and schedules.
- Commissioning: test the full mission across every zone, including return to charge and permitted degraded or interrupted states.
- Handover and responsibility: record the exact hardware and software configuration, exceptions, maintenance, support route and the party responsible for future landscape or map changes.
That is broader than the short startup sequence in a quick guide. A quick guide helps assemble a product. A site installation has to make the product work repeatedly in a changing outdoor environment.
Start With a Site Survey, Not the Installation Kit
Before selecting a wire spool, antenna location or map method, draw the property.
The survey should identify:
- every mowing zone and disconnected lawn;
- flower beds, trees, furniture, irrigation hardware and fixed obstacles;
- holes, exposed roots, low drainage areas, soft ground and seasonal leaf fall;
- narrow passages, gates, steps, driveways and other hard-surface crossings;
- slopes, sharp transitions and the complete return-to-dock route;
- roads, water, drops, public paths and other high-consequence edges;
- charging-station candidates, power access and maintenance access;
- satellite view, reference-station or correction coverage where RTK is used;
- Wi-Fi, cellular, Bluetooth, App and account requirements; and
- likely future landscaping changes.
Husqvarna’s current wired installation guide tells installers to walk the lawn for holes, exposed roots and low drainage areas and to clear obstacles before installation. STIHL’s current iMOW installation guide similarly starts with a site sketch showing fixed objects, the docking station and the planned perimeter-wire route.
Those are brand-specific instructions, but they support a wider principle: poor ground, bad drainage or an unsuitable route cannot be corrected by drawing a more precise boundary.
Slope assessment also deserves its own measurements. Can Robot Lawn Mowers Handle Slopes? explains percentage versus degrees, work-area versus boundary limits, traction and slope-site acceptance.
How Is a Boundary-Wire Robot Mower Installed?
A wired mower detects a signal from a loop installed around the working area. The installation normally includes the charging station, the perimeter loop, islands around selected excluded areas, connectors and—where the exact mower supports or requires them—one or more guide wires.
A sound wired project follows this sequence:
1. Lock the exact manual and layout
Confirm the mower model, market variant, charging station, installation kit and supported number of guide wires. Mark every edge, island, passage and connection before cutting cable.
2. Position the charging station and power system
Use the model’s requirements for surface, clearance, cable routing, power supply and dock approach. The station must support reliable entry and exit as well as charging. Do not assume that the best electrical location is the best navigation location.
3. Install the boundary loop
Follow the exact manual for offsets from different edges, corner geometry, islands, slope boundaries, cable depth or surface fixing and the maximum supported loop. The wire may be pegged to the surface on some systems; burial is not automatically required.
4. Add and connect guide wires where applicable
A guide wire can help a mower reach remote sections or return to the station through a complex lawn. Support, connection points and layout rules vary by model. “Boundary wire” and “guide wire” describe different functions even when a manufacturer uses the same cable material for both.
5. Test before making the installation difficult to change
Verify loop status, boundaries, islands, passages, remote zones and return to dock. A layout that works on an open edge may fail at a tight turn or narrow connection. Document final cable routes and connection locations for repair and landscape work.
Husqvarna’s current wired setup page illustrates this sequence and says its wire can be fixed on the lawn surface. That does not make its distances or connector rules universal. The correct dimensions always come from the current manual for the exact product.
How Is an RTK Robot Mower Installed?
RTK installation replaces the physical perimeter loop with a virtual map, but it introduces a positioning chain. The mower must receive satellite observations plus correction data and maintain the communications and sensor conditions required by its design.
There are two important routes.
Local reference station
A local RTK system adds a fixed reference station or antenna. The installer must verify the approved position, sky view, mounting, power, communication coverage, compatibility and procedure after replacement or movement.
Husqvarna’s current U.S. EPOS information says its personal reference station needs an open sky view and access to power, and that moving it after virtual boundaries are created can require the map to be recreated. That is a product-family example, not a universal angle or mounting rule for every RTK mower.
Mammotion’s current support library separately publishes manuals by product generation, including a June 2026 LUBA 3 AWD manual set, while its LUBA 2 library has separate charging-station and RTK-station material. That separation is a useful warning: do not assume that an antenna, dock or procedure is interchangeable across generations.
Network RTK or cloud corrections
Some systems obtain corrections through a regional network rather than a customer-installed station. This can reduce local hardware, but it creates an address- and service-dependent installation.
Verify:
- service availability at the exact operating address;
- internet or cellular coverage across the work area;
- the account region and compatible SKU;
- included and renewable data or correction-service terms;
- behavior during a network interruption; and
- map backup, transfer and recovery procedures.
Husqvarna’s current EPOS page distinguishes its cloud route from a personal reference station and says cloud-based operation requires supported coverage plus stable Wi-Fi or 4G where applicable. It also states that cloud coverage is not the same thing as cellular coverage. Procurement teams should therefore verify both layers rather than treating “connected” as one checkbox.
How Are LiDAR and Vision Robot Mowers Installed?
A LiDAR- or vision-led mower may remove both the perimeter cable and the GNSS antenna. It does not remove the dock, map or commissioning work.
The installer still has to:
- prepare the mower and sensors as required;
- install and power the charging station;
- connect the approved App and local network functions;
- create or verify the work-area map;
- define exclusions, channels and routes;
- test boundaries, obstacles and return to dock; and
- record conditions that may change sensor performance.
Dreame’s current A1 installation support requires an open, flat charging-station location near the lawn, power and Wi-Fi, followed by physical station assembly and charging checks. Its separate mapping support adds battery, Bluetooth, docking and LiDAR-preparation conditions.
These pages demonstrate why “no antenna” is not the same claim as “no site setup.” Local-mapping systems also deserve tests for sensor blockage or contamination, changing vegetation, weak visual features, temporary objects and map recovery. The applicable failure modes depend on the exact model and sensor stack.
Where Should the Charging Station Go?
The charging station is simultaneously an electrical asset, a navigation endpoint and a maintenance location.
Evaluate each candidate position against the current model instructions for:
- level and stable support;
- drainage, irrigation and permitted weather exposure;
- the approved power supply, cable and outlet arrangement;
- straight or unobstructed approach space;
- boundary-wire, guide-wire, satellite or local-feature requirements;
- Wi-Fi, cellular or Bluetooth needs;
- access for cleaning, removal and seasonal storage;
- trip, public-access, theft and landscape risks; and
- the effect of a cover or nearby metal on the positioning system.
Husqvarna’s current charging-station guide explicitly separates clearance advice for wired and EPOS installations while keeping common principles such as a nearby power source, level surface and unbent baseplate. STIHL and Dreame publish their own product-specific placement instructions.
That is why this article does not give one universal clearance. The correct dock geometry depends on the mower, installation architecture and market documentation.
How Should Zones, Paths and Schedules Be Configured?
A virtual map is an operating plan, not just an outline.
For a multi-zone property, the installation may need:
- separate work areas with different cutting heights or schedules;
- stay-out zones around permanent or temporary exclusions;
- transport paths between mowing areas and the dock;
- a docking point and approach route;
- a maintenance or parking point for commercial operations; and
- physical handling rules for disconnected areas that the mower cannot reach autonomously.
Husqvarna’s current commercial EPOS onboarding lists a work area, charging station, stay-out zones, docking point, transport paths and maintenance point as distinct parts of the system. Its workflow maps work areas and stay-out zones in different driving directions and connects paths to the docking point.
The lesson is not to copy that interface into every brand. It is to specify every operational object before acceptance. A lawn outline alone does not prove that the mower can reach remote areas, travel without cutting where required and return to charge.
What Should Be Tested During Commissioning?
The first successful departure from the charging station is not acceptance. Commissioning should test the complete intended mission.
Test the normal mission
- Mow every work area, including remote and narrow sections.
- Follow every required transport path.
- Respect every boundary and stay-out zone.
- Navigate representative turns, transitions, slopes and obstacles.
- Return to the dock from different zones and under low-battery logic.
- Resume or recover as documented after ordinary interruptions.
Record the result
- completed and missed areas;
- manual rescues or repositioning;
- boundary crossings or unsafe approaches;
- localization, loop, connectivity and map faults;
- wheelspin, rutting or turf damage;
- collision, obstruction and stop events;
- charging and docking failures; and
- corrective work and retest results.
Test only within approved conditions
Do not create a dangerous fault or deliberately operate outside the manual. Where the product provides an approved diagnostic or degraded-mode test, record the result. Otherwise, document the limitation and change the site design, exclusion zone or operating procedure.
For example, Husqvarna’s current EPOS Support by Wire guide shows that behavior during weak satellite coverage can depend on whether the mower is using systematic or irregular mowing and how support wire is configured. Hybrid installation therefore requires exact mode-level testing, not a generic assumption that one sensor always backs up another.
DIY or Professional Robot Mower Installation?
DIY can be reasonable when the manual permits it, the property is simple, the installer can complete the physical and digital work safely and there is a clear support route. Professional installation becomes more valuable when the site has multiple zones, long or complex wiring, hard-surface crossings, substantial slopes, high-consequence edges, difficult positioning coverage, public access or contractual performance requirements.
Do not evaluate a professional quotation only by labor hours. Ask what is included.
Husqvarna’s current U.S. professional installation service lists a property walk-through, charging setup, defined wired or wireless work, firmware, App pairing, settings guidance and follow-up. It separately identifies potential additional charges such as outlet changes, hard-surface crossings, extra obstacles, excess wire or hardware and specialized equipment.
STIHL’s current guide likewise says DIY is possible but recommends dealer expertise for large or complex gardens. Service scope, availability and qualifications still vary by country, dealer and transaction. The contract—not the brand name—should define the deliverable.
How Much Does Robot Lawn Mower Installation Cost?
There is no reliable universal installation price. The total depends on the country, taxes, site size, perimeter complexity, architecture, electrical work, hard-surface crossings, reference-station mounting, connectivity, landscaping corrections, installer scope and follow-up.
Use this cost structure instead:
```text
total installed cost = mower + dock and power + boundary or positioning hardware
+ site preparation + installation labor + mapping and commissioning
+ connectivity or correction services + training and documentation
+ remedial work + follow-up + future site changes
```
A comparable quotation should state:
- the exact mower and market SKU;
- included dock, wire, connectors, antenna, reference station and mounting hardware;
- included perimeter length, zones, obstacles, paths and hard crossings;
- electrical, network and landscaping work included or excluded;
- mapping, firmware, App, account and operator training;
- acceptance procedure and included rework;
- travel, follow-up, warranty and response time; and
- future rates for wire repair, map changes, reference-station movement or site expansion.
The lowest setup quote can become the highest lifecycle cost if the site fails repeatedly, a proprietary correction service is unavailable or every landscape change requires a paid return visit.
Who Is Responsible After Installation?
Separate the parties before a fault occurs:
- brand owner;
- legal manufacturer for the exact product;
- factory, if origin matters to the transaction;
- destination-market importer;
- contract seller;
- installer or commissioning provider;
- App, cloud, connectivity or correction-service provider;
- repair and spare-parts provider; and
- warranty party.
One company may perform several roles, but the brand name does not prove that it performs all of them.
The handover package should include the dated site plan, exact mower and accessories, serial numbers, firmware, account ownership, boundary or map version, excluded areas, settings, test evidence, open exceptions, maintenance instructions and the person authorized to change the site after acceptance.
For the wider operating system and lifecycle questions, see How Do Robot Lawn Mowers Work?, Are Robot Lawn Mowers Safe? and How Long Do Robot Lawn Mowers Last?.
B2B Installation and Acceptance Checklist
Before ordering
- Obtain the current manual for the exact market SKU and every required accessory.
- Complete a site plan with zones, risks, ground conditions, routes, power and positioning conditions.
- Decide whether the architecture is wired, local RTK, Network RTK, LiDAR/vision or hybrid.
- Define included work, exclusions, site preparation and responsibility for changes.
- Set acceptance thresholds for completion, interventions, boundaries, turf condition, docking, alarms and support.
During installation
- Record the mower, dock, power supply, wire or positioning equipment, radio and plug configuration.
- Save the final physical cable route or digital map, zones, paths and settings.
- Confirm firmware, App, account region, connectivity and service terms.
- Photograph or otherwise record critical dock, reference-station, crossing and boundary locations.
- Track deviations from the approved site plan and obtain written approval for them.
During commissioning
- Test all work areas, paths, exclusions, difficult turns and return-to-dock routes.
- Record interventions, boundary events, signal faults, missed areas, turf damage and charging results.
- Correct failures and repeat the full affected mission.
- Provide operator training, stop procedures, routine inspection and support contacts.
- Sign a dated acceptance record with exceptions and remedial responsibility.
Frequently Asked Questions
How do you install a robot lawn mower?
Survey the site, install the charging and power system, establish the physical boundary or positioning infrastructure, configure maps and routes, then test every zone and the return-to-dock mission. Follow the current manual for the exact model; distances and steps are not universal.
Does a robot lawn mower boundary wire have to be buried?
Not always. Some systems allow the wire to be pegged to the surface, while burial may be permitted or preferred in other projects. Use the exact manual for cable depth, fixing, corners, crossings and edge offsets.
Do wire-free robot lawn mowers need installation?
Yes. They still need a charging station and map. Depending on the product, they may also require an RTK reference station, Network RTK or cloud service, internet connection, regional account, App and tested transport paths.
Where should a robot lawn mower charging station be installed?
Choose a location that meets the exact model’s requirements for level support, drainage, power, approach clearance, boundary or positioning signal, connectivity and maintenance access. There is no one clearance that fits every wired, RTK or LiDAR mower.
Can I install a robotic lawn mower myself?
Often yes if the manufacturer permits DIY installation and the site is simple. Professional installation is more useful for complex wiring, multiple zones, difficult positioning coverage, public or commercial sites, hard crossings and projects that need documented acceptance.
How long does robot lawn mower installation take?
There is no trustworthy universal duration. Time depends on the site, architecture, perimeter length, obstacles, crossings, dock and power work, mapping, corrections and retesting. Ask for a written scope rather than relying on a generic time claim.
How much does robot lawn mower installation cost?
Cost varies by market and project. Compare the mower, dock and power, wire or positioning hardware, site work, labor, mapping, services, commissioning, documentation, follow-up and future changes—not one headline installation fee.
What should a professional robot mower installation include?
At minimum: a site survey, exact-product configuration, charging and boundary or positioning installation, maps and schedules, complete mission testing, operator handover, records, exceptions, support contacts and written responsibility for remedial work.
Final Takeaway
The best robot lawn mower installation is not the one with the fewest visible components. It is the one whose infrastructure matches the site, whose complete mission has been tested and whose support responsibilities are documented.
A physical wire, local reference station, correction network, LiDAR map or hybrid sensor stack can all be valid. None removes the need to qualify the site, place the dock correctly, configure routes, test failure-sensitive areas and preserve an acceptance record.
For buyers and channel partners, the practical rule is: buy the installed operating system, not only the mower.
Official Sources
- Husqvarna Automower wired installation
- Husqvarna Automower professional installation
- Husqvarna commercial EPOS onboarding
- Husqvarna EPOS installation options
- Husqvarna EPOS Support by Wire
- Husqvarna charging-station placement
- STIHL iMOW installation guide
- Dreame A1 installation support
- Dreame A1 mapping support
- Segway Navimow installation guide
- Mammotion LUBA 3 user manuals
Explore 2026 new models