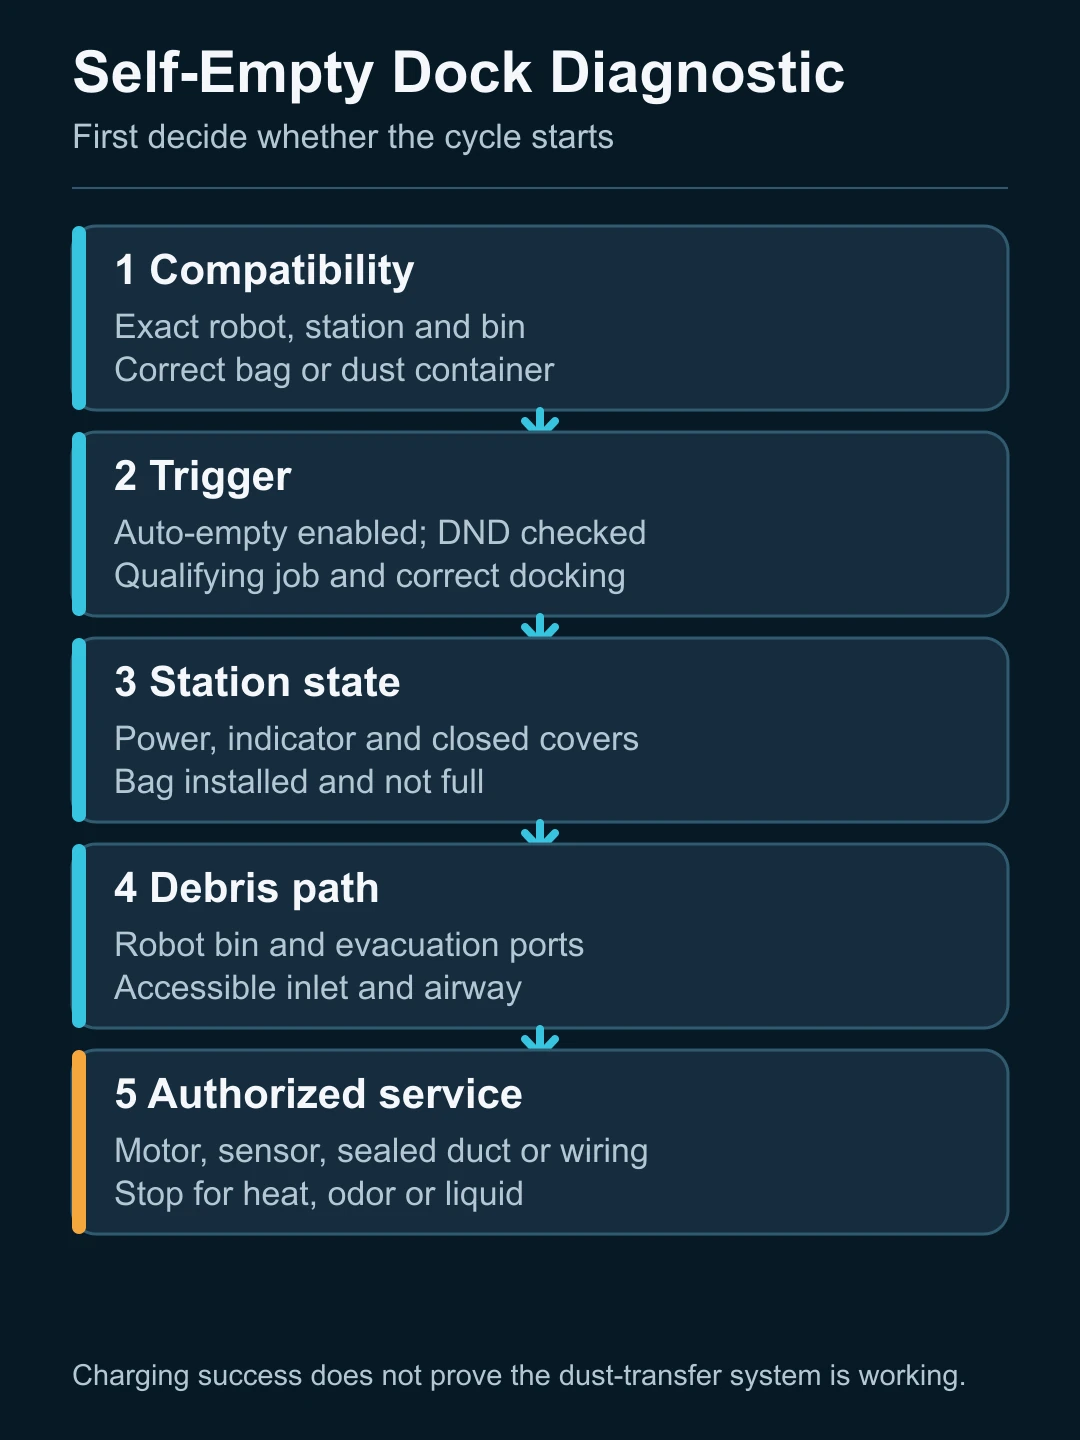
- First identify whether self-emptying never starts, starts but transfers no debris, or runs with weak airflow or unusual noise.
- Check model support, App and DND settings, the completed-cleaning trigger, bag and cover installation, robot bin, evacuation ports and accessible airways before assuming the dock motor has failed.
- Unplug the station before approved airway maintenance and leave mains wiring, the evacuation motor, sealed ducts and damaged electronics to authorized service.
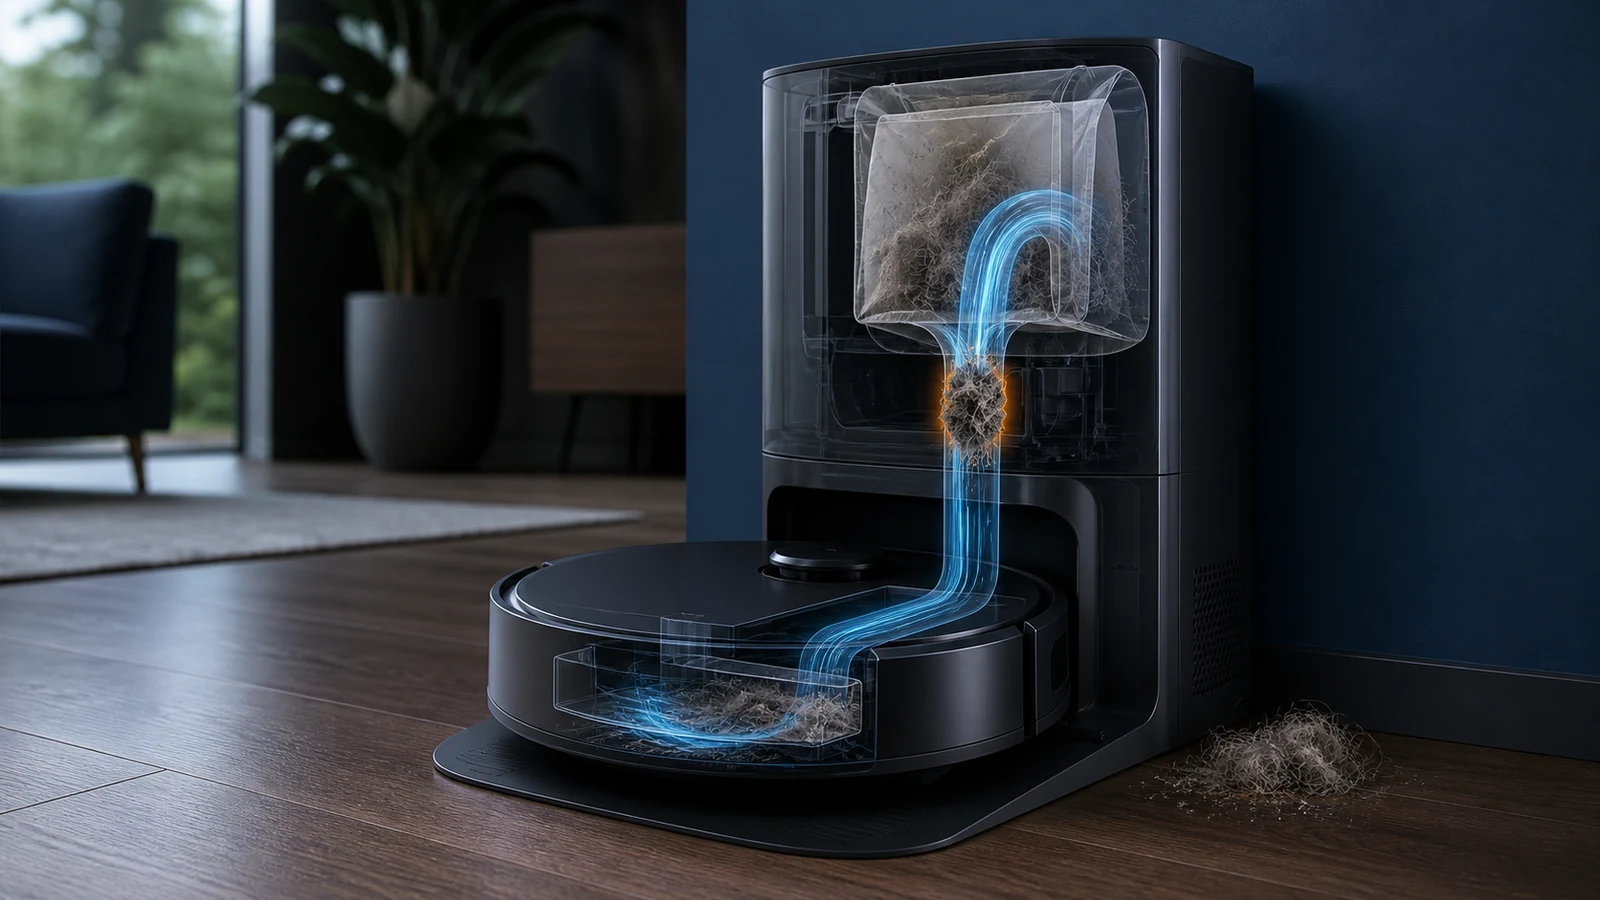
If your robot vacuum's self-empty dock is not working, first determine whether the emptying cycle fails to start or whether the dock motor runs but debris stays in the robot. A cycle that never starts points to compatibility, App settings, Do Not Disturb, the cleaning trigger, docking state, bag detection or station power. A cycle that runs without transferring debris points more strongly to a full or poorly installed bag, an incompatible bin, a blocked evacuation port or a restricted airway.
Do not open a mains-powered dock or keep restarting an evacuation motor that sounds strained, smells burnt or overheats. Record the dock light, App message, whether manual emptying works, the sound of the cycle and where debris remains before cleaning or replacing parts.
Self-Empty Dock Problems at a Glance
| What happens | Main area to check | First safe check |
|---|---|---|
| No emptying sound after docking | Trigger, setting, DND, docking state or power | Confirm the exact model supports emptying and review the App status |
| Manual empty works, automatic does not | Auto-empty setting, DND or job conditions | Compare manual and automatic triggers without changing hardware |
| Motor runs but robot bin stays full | Robot bin, evacuation ports or airway blockage | Power down and inspect only user-accessible paths |
| Emptying is weak or takes repeated attempts | Full bag, filter or partial restriction | Check bag status and approved filters or ducts |
| Station shows a red or error light | Bag, cover, clog, voltage or dock fault | Use the exact manual's indicator table |
| Dust leaks inside the station | Bag seal, bag installation, cover or damaged duct | Stop emptying and correct only approved user-serviceable parts |
| Robot charges but does not empty | Emptying trigger or airflow system | Keep charging diagnosis separate from dust transfer |
| Robot never reaches the station | Navigation or docking | Use the return-to-dock diagnostic first |
The dock's indicator colors, bag sensors, filters, trigger rules and disassembly steps differ by model. Use this page to locate the failed stage, then follow the exact product instructions.
First Identify Which Failure You Have
Self-emptying is a short airflow event with several prerequisites. The robot must support the station, dock correctly, meet the model's trigger conditions, allow emptying in software, present the correct bin or evacuation path, and connect that path to a usable bag or dust container.
Classify the symptom before touching the dock:
- No cycle starts: focus on compatibility, job history, settings, DND, bag or cover detection, dock power and errors.
- The cycle starts but debris remains: focus on the robot bin, ports, bag and airway.
- The cycle is weak, noisy or repeatedly restarts: stop if abnormal, then check accessible restrictions and service limits.
- The robot does not dock: use the robot vacuum return-to-dock guide; the evacuation system cannot trigger without correct docking.
1. Confirm Model, Station and Bin Compatibility
Not every robot in a product family supports self-emptying, and some systems require a particular dustbin, inlet configuration, station or regional version. eufy support, for example, distinguishes self-empty-capable models from robots that must be emptied manually. A Roborock Auto-Empty Dock manual states that its supported robot must use the specified auto-empty dustbin and have the relevant inlet path prepared.
Check the exact robot model, station model, robot dustbin, bag or bagless container and any required cover. Physical fit or charging compatibility is not proof that dust evacuation is supported.
If the fault began after changing the robot bin, filter, brush cover, station bag or another consumable, compare the installed part number and orientation with the manual.
2. Check Whether the Cycle Should Have Triggered
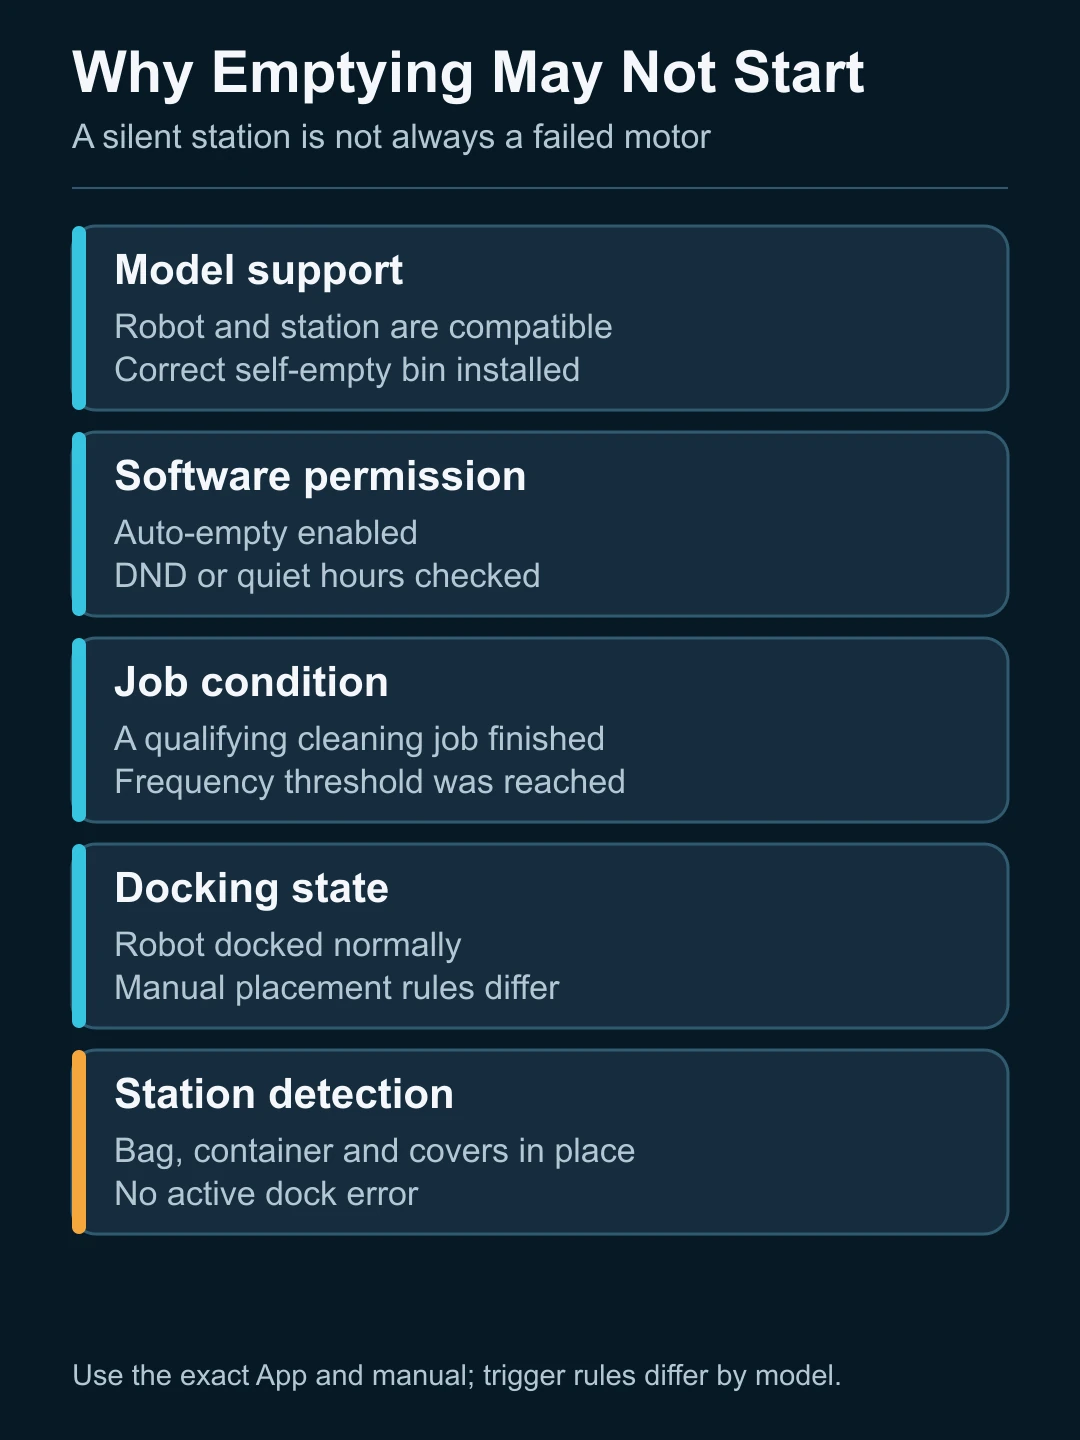
Official support pages document several conditions that can prevent automatic emptying without indicating a broken motor:
- auto-emptying may be disabled in the App;
- DND or quiet hours may suppress the cycle;
- some products do not empty after the robot is placed on the station manually;
- a return without a qualifying cleaning job may not trigger emptying;
- frequency may be based on cleaning cycles, cleaning time or area;
- a manually initiated empty command may be available only while correctly docked.
Do not treat one brand's timing as universal. Check the cleaning history, current DND window and model-specific emptying preference. Then perform one normal approved job-and-return cycle or one manual empty command, rather than repeatedly lifting the robot on and off the station.
3. Check Station Power and Error Indicators
A station can charge a robot yet still have a separate fault affecting evacuation, or it may be unpowered while the robot appears normally seated. Confirm the cord, outlet and station status without opening the base.
Use the exact indicator table. A red, orange or flashing light can mean different things across products: missing bag, full bag, open cover, airway blockage, incompatible part, voltage problem or another dock error.
If the station trips an outlet, smells burnt, becomes unusually hot, makes electrical noise or has liquid intrusion, unplug it and stop. Do not move a wet all-in-one station merely to continue testing.
4. Inspect the Bag, Cover and Filter
A disposable bag may be full, poorly seated, missing or unable to open its inlet. A bagless dock may have a full dust container, dirty filter or unlatched cover. The station may intentionally refuse to run when a required cover or bag is not detected.
With the station unplugged and following the manual:
- remove the bag or container using its normal handle;
- check whether the inlet is sealed, folded or blocked;
- install the correct replacement fully in its slot;
- clean only filters designated as user-serviceable;
- close every cover and latch in the specified order.
Do not reuse a disposable bag unless the manufacturer explicitly permits it. Do not bypass a bag sensor, run the dock without its filter or convert a bagged system to bagless operation.
5. Inspect the Robot Bin and Evacuation Ports
The dock cannot transfer debris if the robot's bin outlet is blocked, its evacuation flap cannot move, the wrong bin is fitted, or a filter or brush cover is installed incorrectly. Dense pet hair, tissue, large debris and an overfilled robot bin can form a plug before the station airway.
Remove power from the robot as instructed and inspect only accessible user-maintenance areas. Empty the robot bin manually, remove loose debris, check the evacuation opening and reinstall the bin, filter and brush cover correctly.
The robot vacuum pet-hair guide explains why hair handling and emptying frequency matter as a system. Increasing station runtime cannot fix a solid obstruction.
6. Trace the Accessible Airway
When the evacuation motor runs but transfer is weak, the airflow path may be restricted between the robot outlet, station inlet, internal duct, bag inlet and exhaust filter. Some manuals provide an operator procedure for removing a duct cover or clearing an inlet; others do not.
Follow only the exact dock procedure. Unplug the station first, protect the floor, and do not reach through a moving fan path. Do not use water inside a dry dust airway unless the manufacturer specifically marks a removable part as washable and gives a full drying requirement.
If a blockage lies behind screws, wiring, a sealed panel or the evacuation motor, stop at authorized service.
7. Use Sound and Debris Location as Evidence
The symptom after one controlled test can narrow the fault:
- Normal strong sound, little transfer: inspect the robot outlet, bin flap and dense plug.
- Higher-pitched or strained sound: suspect a restriction and stop repeated cycles.
- No motor sound with a valid manual command: investigate trigger, detection, power or internal electrical control.
- Dust reaches the bag compartment but leaks: stop and inspect bag sealing, cover or duct damage.
- Robot bin empties partly: reduce excessive debris load, inspect hair bridging and use the approved emptying frequency.
Do not use sound alone to condemn the motor. Record it with the App error and physical debris location.
When to Stop and Use Service
Use qualified or authorized service when:
- the evacuation motor will not start despite a valid command and correct external conditions;
- the station overheats, smells burnt, sparks, trips power or shows liquid intrusion;
- the airflow path is blocked behind a sealed or electrical panel;
- a bag sensor, lid switch, internal valve or control board appears faulty;
- the dock or robot evacuation port is cracked or deformed;
- the same fault returns immediately after approved maintenance.
Provide the robot and station model numbers, serial number, firmware, bag or bin part number, App screenshots, indicator state and a short video of one failed cycle.
What Dealers and Brands Should Record
Returns labeled “auto-empty does not work” should be separated into no-trigger, no-airflow, blocked-transfer and leakage cases. Record the installed consumables, DND settings, job duration, manual-empty result, station sound, robot-bin fill and blockage location.
This evidence matters for buyers because a self-empty product includes recurring bags or filters, dock airflow, robot-bin geometry, software triggers and after-sales support. The self-emptying robot vacuum market guide covers the commercial system behind the feature.
FAQ
Why does my robot vacuum charge but not self-empty?
Charging and dust evacuation are separate functions. Confirm that the model and bin support the station, auto-emptying is enabled, DND is not suppressing it, the cleaning job qualifies and the bag, cover and airway are correctly installed.
Why does the dock make noise but leave dirt in the robot?
The motor may be running against a blocked robot outlet, dense debris plug, full or poorly installed bag, restricted station inlet or duct. Stop repeated cycles if the sound is strained and inspect only approved user-accessible paths.
Does manually placing the robot on the dock trigger self-emptying?
Not on every model. Several official support pages state that automatic emptying may not trigger after manual placement. Use the App or physical manual-empty command only as the exact manual describes.
Can Do Not Disturb stop a self-empty dock?
Yes, on products that suppress evacuation noise during DND. Check both the DND schedule and any separate “disable auto emptying” preference.
Can I run a self-empty dock without a bag?
Only if the station was designed as a bagless system. Do not bypass a required bag, cover, filter or detection switch.
Final Answer
When a robot vacuum self-empty dock is not working, first classify the failure: no cycle, no debris transfer or weak/noisy transfer. Confirm exact compatibility and trigger conditions, then check App and DND settings, station power, bag and cover installation, the robot bin, evacuation ports and only the user-accessible airway.
Unplug the station before approved maintenance. Do not open mains wiring, bypass bag detection or keep running a strained motor. Internal motors, sensors, ducts and electronics belong with authorized service.