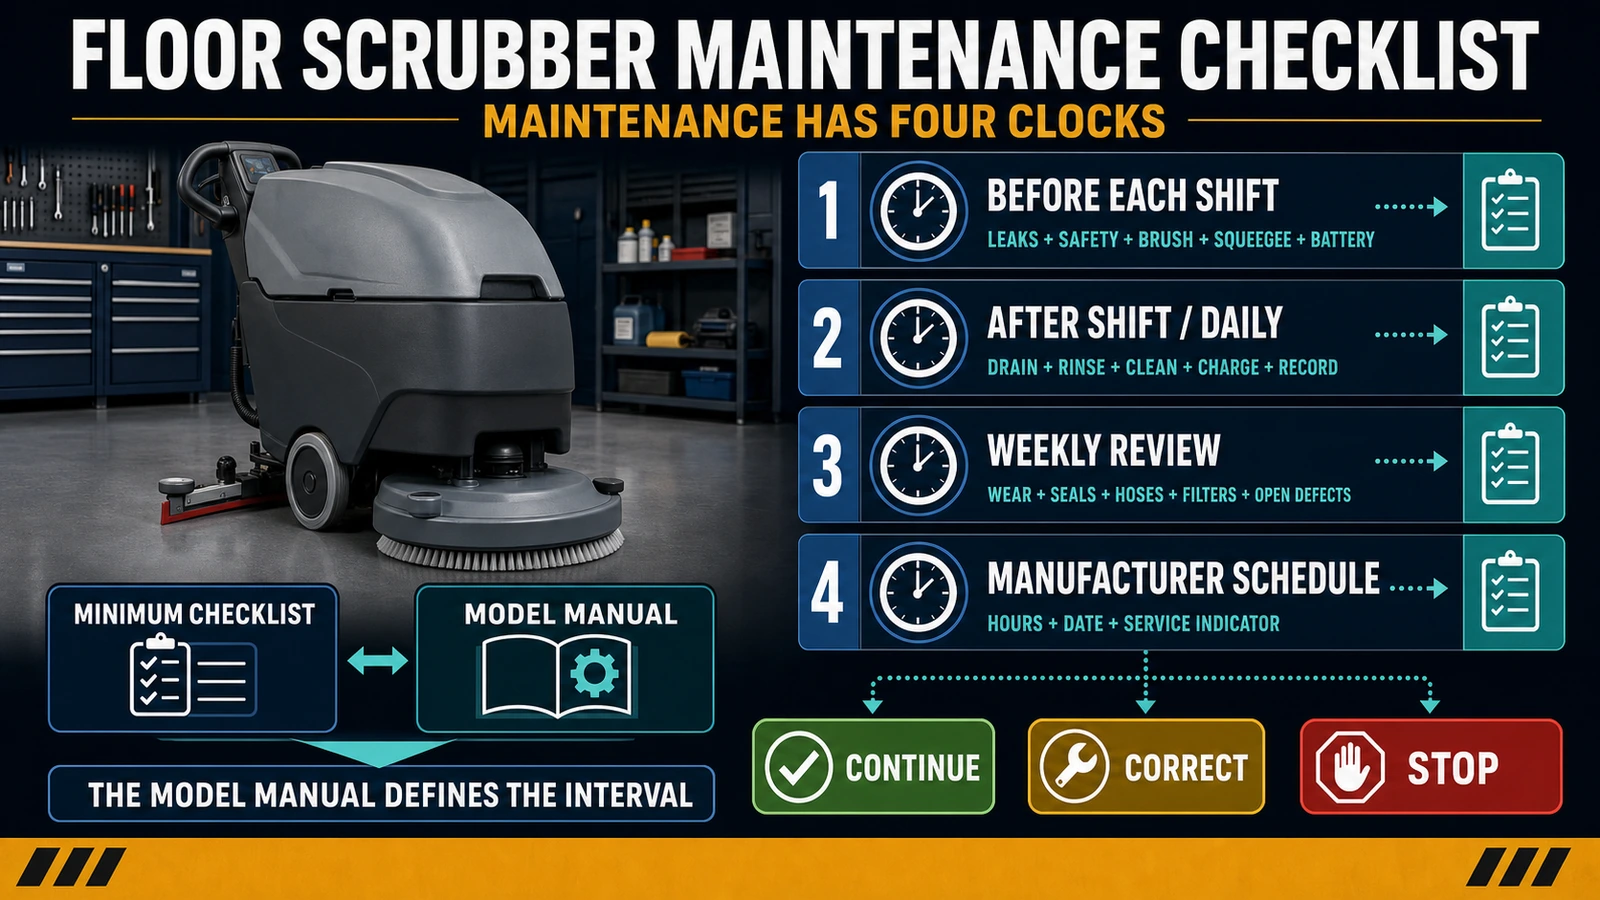
- Separate before-shift, after-shift, weekly and manufacturer-scheduled work instead of using one undated parts list.
- Give every maintenance task an owner, a record and a decision: continue, correct before use, or stop and escalate.
- Treat this checklist as a minimum control layer; the exact machine, battery and charger manuals always define model-specific procedures and intervals.
In this article 12 sections
A floor scrubber preventive maintenance checklist should separate before-shift safety checks, after-shift cleaning, weekly inspection and manufacturer-scheduled service. Every task needs an owner, a record and a decision: continue use, correct the issue before use, or stop and escalate. Use this checklist as a minimum control layer—not as a replacement for the exact machine, battery and charger manuals.
Preventive maintenance works when a small change is found before it becomes a failed route, damaged component or unsafe wet floor. A long list of parts is not enough. The checklist must tell a trained person when to inspect, what condition to record, who may act and who can release the machine.
This guide covers conventional commercial scrubber dryers. For equipment selection and maintenance access, see the commercial floor scrubber buying guide. If the machine is already leaving water or streaks, use the separate water-pickup troubleshooting guide.
Printable Floor Scrubber Maintenance Checklist
The table below is a cross-model starting point. Add the exact tasks and intervals from the operator manual for each model and battery configuration in your fleet.
| Frequency | Minimum task | Default owner | Record | Decision |
|---|---|---|---|---|
| Before each shift | Check for visible leaks, damage, missing guards and unreadable safety labels | Trained operator | Pass / defect | Continue, correct or stop |
| Before each shift | Check brushes, pads, pad drivers, deck skirt and visible fasteners | Trained operator | Condition | Continue, correct or stop |
| Before each shift | Check squeegee blades, assembly and visible recovery hose | Trained operator | Condition | Continue, correct or stop |
| Before each shift | Confirm recovery tank, debris tray and float or shutoff screen are ready | Trained operator | Ready / not ready | Correct before use |
| Before each shift | Check controls, emergency stop, braking and safety devices required by the model | Trained operator | Functional / defect | Stop if defective |
| Before each shift | Check battery indication, charger disconnected and cord stored; inspect visible cables and connectors | Trained operator | Condition | Stop if damaged or abnormal |
| After each shift | Drain and rinse recovery components at the approved disposal point | Trained operator | Completed | Correct before storage |
| After each shift | Drain or manage solution tank as the manual and chemistry program require | Trained operator | Completed | Correct before storage |
| After each shift | Remove debris; clean brushes or pads, squeegee and operator-accessible screens | Trained operator | Completed + wear | Replace or escalate if needed |
| After each shift | Leave tanks, hoses, squeegee and deck in the manual-approved storage position | Trained operator | Completed | Correct before storage |
| After each shift | Charge with the approved charger and battery procedure | Trained operator | Start/end status | Stop if cord, battery or charger is abnormal |
| Weekly | Inspect wear, seals, visible hoses, filters, fasteners and recurring residue | Operator + supervisor | Condition + action | Correct, plan parts or stop |
| Weekly | Review wet-battery electrolyte only if the exact battery and manual require it | Trained, authorized person | Level/action | Follow battery procedure |
| Weekly | Review defects, repeated complaints, hours and overdue actions | Supervisor | Signed review | Schedule or isolate |
| Manual interval | Complete hour-, date- or service-indicator tasks | Assigned qualified person | Hours + work order | Release only after completion |
| Any time | Record leaks, abnormal heat, odor, noise, vibration, fault codes or unsafe floor result | Operator stops; supervisor isolates | Defect report | Stop and escalate |
Print one controlled checklist per model or machine family. Put the model, asset ID, battery type and manual revision at the top. A generic sheet without those fields invites the wrong battery procedure or an outdated service interval.
Before-Each-Shift Inspection
The pre-shift check decides whether the machine is ready to enter the route. It is not an internal repair inspection.
1. Identify the machine and review open defects
Confirm the asset ID and model. Read the previous shift’s record. Do not accept a verbal “it was probably fixed” when the log still shows an open safety, charging, leakage or control defect.
Record the hour meter when the service schedule uses operating hours. Check whether a service indicator is active. A due service item does not become optional because the machine still moves.
2. Inspect the machine from the outside
Walk around the machine on a level surface with it switched off. Look for:
- fluid below or inside the machine where it should not be;
- damaged, loose or missing guards, covers, skirts or visible fasteners;
- damaged wheels, squeegee supports or deck components;
- a pinched, split, disconnected or badly abraded visible hose;
- a damaged charger cord, plug, connector or exposed conductor;
- battery swelling, leakage, corrosion, abnormal residue or other visible damage;
- unreadable or missing safety labels required by the model.
The Tennant T500 operator manual instructs operators to check for fluid leaks and confirm that safety devices are in place and working before operation. It also says not to operate the machine when it is not in proper operating condition.
3. Check the cleaning and recovery components
Inspect the brush, pad or pad driver for wear, damage and secure installation using the model’s approved method. Check the deck skirt or splash guard. Remove loose debris only after the machine has been made safe according to its manual.
Inspect the squeegee blades for cuts, severe wear, deformation and trapped debris. Confirm the assembly and visible hose are secure. Make sure the recovery tank is ready, the debris tray is clean and the float or shutoff screen is installed and clear.
These are preventive checks. If the machine already leaves a center streak, a wide wet trail or no recovery, move to the dedicated pickup diagnostic process instead of turning this page into an improvised repair manual.
4. Check the work area and functional controls
Remove obstacles and unsuitable debris before wet scrubbing. The T500 pre-operation list begins with sweeping the area and removing obstructions. The correct dry-debris process depends on the task; our sweeper vs scrubber guide explains that boundary.
Following the operator manual, confirm the required controls and safety devices function before entering the route. This can include the emergency stop, brakes, steering, horn, lights or presence controls, depending on the machine. If a required control fails, do not compensate with “extra care.” Stop and report it.
After-Shift and Daily Maintenance
Daily work removes the water, soil and chemistry that otherwise remain in tanks, screens, brushes, pads and the recovery path.
Drain and rinse the recovery system
Use the site’s approved wastewater disposal point and follow the chemical label and local requirements. Drain the recovery tank using the machine’s procedure. Rinse the tank, debris tray and operator-accessible float or shutoff screen. Remove residue from the lid seal area without damaging the seal.
Do not direct a hose or pressure washer at electrical parts or the control area. Tennant specifically warns against power spraying or hosing off the T500 because an electrical malfunction may occur; it calls for a damp cloth on the machine exterior.
Leave the tank in the manual-approved position for ventilation when stored. Do not invent a universal “lid open” rule for every transport or storage condition; use the model instructions.
Manage the solution system
Drain, retain or flush the solution according to the machine manual, chemical program and expected storage period. Different dosing, detergent and water-treatment systems have different procedures. Never add an unapproved descaler, solvent or disinfectant because a generic checklist says “flush.”
Inspect operator-accessible filters or screens only at the interval and by the method the manual assigns. A clogged solution filter can affect performance, but diagnosing no-flow failures belongs in the separate supply-system procedure, not in routine maintenance.
Clean the brush, pad and deck area
Remove hair, string, labels and debris with the machine isolated as required by the manual. Clean the brush or pad and examine its working surface. Record uneven wear, cracking, missing bristles, a damaged pad driver or repeated debris wrapping.
Replace or rotate components only when the operator is trained, the manual allows it and the correct part is available. Do not run a damaged component “for one more shift” if it can detach, damage the floor or overload the machine.
Clean the squeegee
Remove and clean the squeegee using the model’s procedure. Wipe the blades and inspect the edges. Clear debris from operator-accessible trays and visible hose ends without inserting tools into an energized system.
Blade rotation, reversal or replacement criteria differ by design. The daily record should capture the condition and action, not apply one universal blade angle or wear limit.
Charge and store correctly
Use the charger approved for the installed battery and follow the machine, battery and charger manuals. Confirm that the charging location is suitable for the battery type and workplace. Do not charge through a damaged cord or connector.
Record at least the starting battery indication, charging fault or interruption, and ready status for the next shift. Repeatedly handing over a partially charged machine is an operating-control failure even when no component has failed yet.
Weekly Maintenance
Weekly review looks for trends that a fast end-of-shift clean can miss.
Inspect:
- squeegee blades, holder, wheels, drip traps or trays assigned by the manual;
- brush or pad wear pattern, deck skirt and visible deck hardware;
- tank lid gasket, drain caps, visible seals and hoses;
- solution and recovery screens or filters due under the model schedule;
- wheels, bumpers, visible cables, connectors and charger cord;
- residue, corrosion, looseness or leakage around operator-accessible battery areas;
- repeated defects, fault indications and consumable use.
The T500 manual places wet-battery electrolyte and a squeegee drip-trap reservoir in its weekly group. Nilfisk’s SC550 quick start guide groups blade and solution-filter checks as weekly work. Those differences are the reason a fleet should not copy one manufacturer’s weekly row into every machine.
The supervisor should sign the weekly review. The signature means more than “the boxes are filled.” It confirms that open defects have owners, replacement parts are ordered, overdue service is scheduled and isolated machines remain unavailable.
Hour-Based and Manufacturer-Scheduled Service
There is no safe universal 50-hour, monthly or annual floor scrubber schedule.
For example, the T500 manual assigns solution-filter cleaning and several cylindrical-deck and recovery-lid tasks at 50 hours, an optional battery-watering system inspection at 100 hours, and motor or belt work at much longer intervals. Its chart distinguishes operator work from trained-personnel work.
The SC550 guide uses daily, weekly, six-month and yearly groups. It says the intervals can vary with operating conditions and that scheduled or extraordinary procedures should be performed by qualified personnel or an authorized service center. Some motor and deck tasks are explicitly marked for authorized service.
Build the asset schedule from:
- exact model and serial-number documentation;
- installed deck, options, battery and charger;
- hour meter, date or onboard service indicator;
- soil, moisture, temperature, shifts and duty severity;
- manufacturer updates and service bulletins;
- site and regulatory requirements that actually apply.
| Scheduled-service record | Required entry |
|---|---|
| Machine | Asset ID, model, serial number |
| Trigger | Hours, date, indicator or defect |
| Source | Manual name, revision and task |
| Work | Inspection, service and parts used |
| Person | Name and authorization level |
| Test | Functional and route-related result |
| Release | Date, time and approving person |
| Next due | Hours, date or condition |
Do not reset a service indicator without completing and documenting the required work.
Battery and Charger Care by Battery Type
The installed chemistry must be visible on the checklist. “Battery machine” is not enough.
| Battery type | Routine control | Never assume |
|---|---|---|
| Flooded lead-acid | Follow the exact electrolyte, watering, charging, ventilation and PPE procedure; keep the battery area clean; inspect approved watering components | That every battery is watered weekly, before charging or to the same level |
| Sealed AGM or maintenance-free lead-acid | Do not add water; keep clean; inspect visible mounting, cables and connectors; use the correct charging profile | That maintenance-free means inspection-free |
| Lithium-ion | Do not add water or open the pack; use the approved battery and charger procedure; watch for damage, abnormal heat, odor, swelling, leakage or fault indication | That another lithium system’s opportunity-charging, temperature or storage rule applies |
Tennant’s manuals distinguish flooded, sealed AGM and, in applicable configurations, lithium-ion batteries. The manual states that sealed AGM batteries do not require watering, while cleaning and other routine maintenance still apply. It also warns that an incompatible charger can damage the battery pack and create a potential fire hazard.
For flooded batteries, Trojan Battery’s technical guidance warns that both under-watering and over-watering are harmful and that watering before charging can cause overflow. Use the exact battery procedure rather than turning that general warning into one fleet-wide filling instruction.
In covered United States construction contexts, OSHA 1926.441 includes designated charging-area and equipment-protection provisions. Other workplaces and jurisdictions can have different requirements. Have the applicable charging arrangement reviewed locally.
Who Owns Each Maintenance Task?
Trained operator
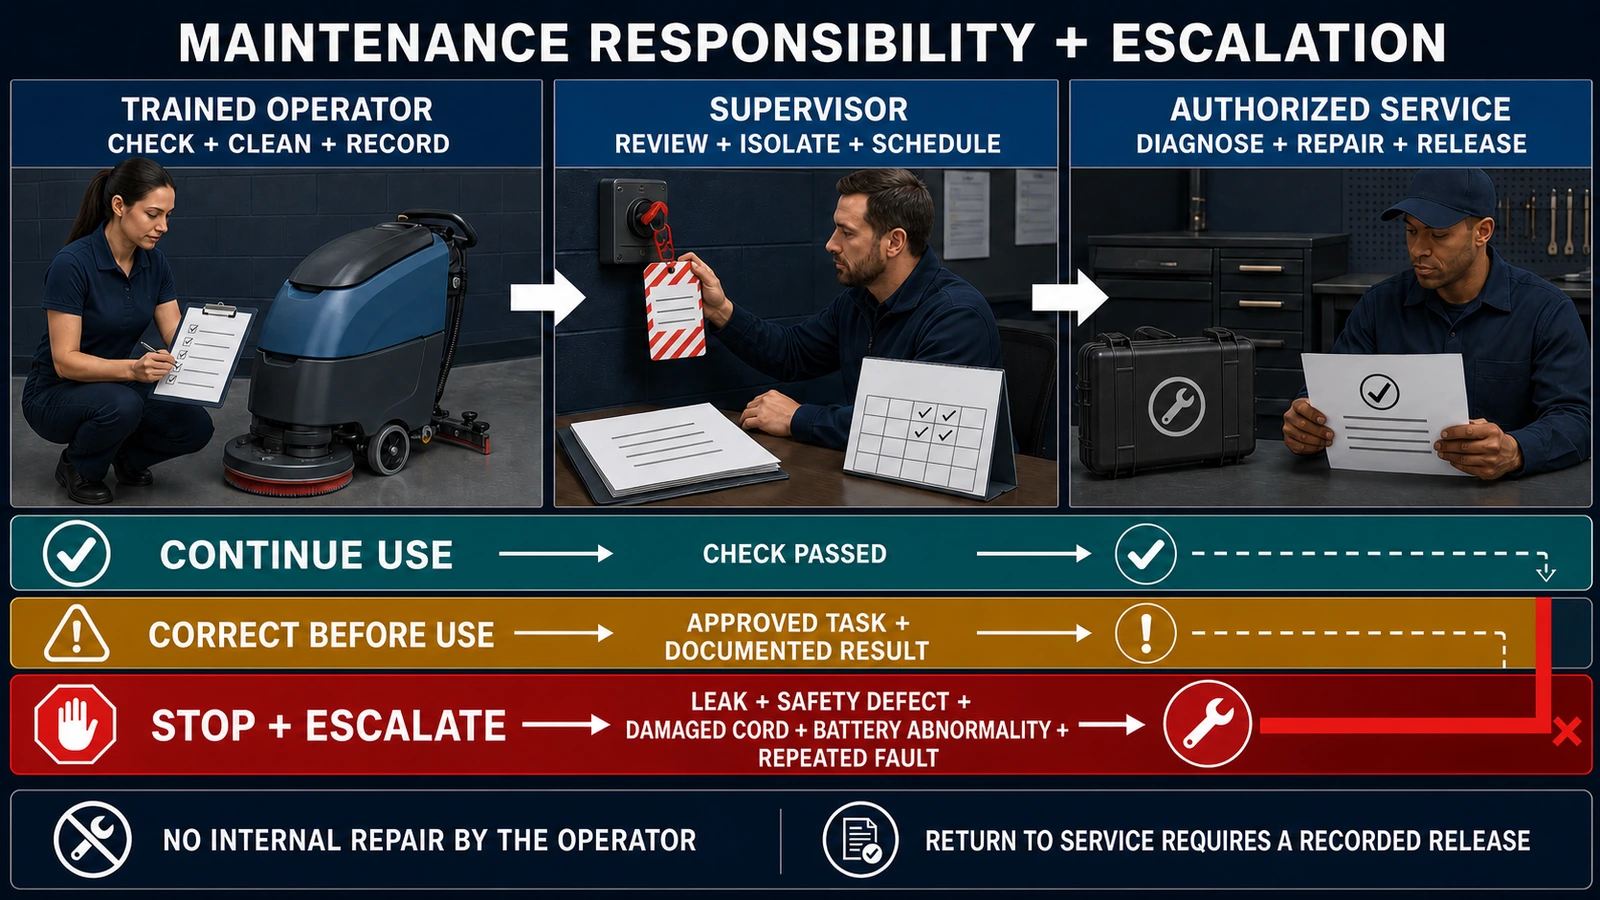
The operator completes the approved pre-shift and after-shift checks, records the condition and performs only the external cleaning, adjustment or consumable work allowed by training and the model manual.
The operator does not diagnose energized circuits, open a charger or lithium battery pack, bypass a safety device, dismantle a motor or continue using a machine with an unresolved stop-use condition.
Supervisor or equipment owner
The supervisor controls the checklist version, training records, open-defect list, service calendar, parts supply and isolation process. The supervisor decides whether a defect can be corrected before use under an approved procedure or requires service.
The supervisor also protects the route. If the scrubber is unavailable, the decision may be to use a backup machine, change the work method or close the affected area—not to erase the defect.
Qualified or authorized service
Qualified personnel or an authorized service provider handle work assigned by the manual, including internal electrical or drive faults, motor and belt service, repeated circuit-breaker trips or fault codes, battery-pack concerns and extraordinary repairs.
The service record should describe the complaint, cause, work, parts, functional test and release. “Repaired” without a test or named releaser is not a complete maintenance record.
Stop-Use and Escalation Conditions
Stop using or charging the machine and follow the site isolation procedure when any of these conditions apply:
- a visible leak has not been identified and safely corrected under an approved operator procedure;
- a required safety device, guard, control, brake, steering function or emergency stop is missing or defective;
- a charger cord, plug, battery cable or connector is damaged, overheated or exposes a conductor;
- a battery is leaking, swollen, deformed, abnormally hot, giving off an unusual odor or showing a serious fault;
- there is smoke, a burning smell, abnormal heat, severe vibration or an unusual mechanical noise;
- a circuit breaker, service code or protection device repeatedly trips after the manual-approved response;
- a brush, pad driver, squeegee, wheel, skirt, hose or visible fastener can detach, strike the floor or release liquid;
- the machine leaves an uncontrolled wet surface that the operator cannot correct through permitted external checks;
- the operator is not trained, cannot identify the installed battery procedure or cannot complete the check safely.
Protect people first. Mark the machine unavailable, retain the key or access control as the site procedure requires, identify the defect and protect any wet or affected area. Do not repeatedly restart a machine to see whether a serious fault disappears.
The exact manual can add stop-use conditions. It can also require a more conservative response than this list.
Floor Scrubber Maintenance Record Template
Use one line per shift and a linked defect or work order when action is required.
| Field | Entry |
|---|---|
| Date and shift | |
| Site / route | |
| Asset ID / model / serial | |
| Battery type / charger | |
| Start and end hours | |
| Before-shift result | Pass / corrected / stopped |
| After-shift tasks | Complete / incomplete |
| Weekly or scheduled tasks due | |
| Condition found | |
| Immediate action | |
| Machine status | Available / restricted / isolated |
| Defect or work-order number | |
| Operator name | |
| Supervisor review | |
| Service release and next due |
Use controlled terms. `Pass` means no open condition prevents the assigned use. `Corrected` means an authorized, documented action was completed before operation. `Stopped` or `isolated` means the machine is not available until the named release requirement is met.
Track recurring conditions by asset. Three squeegee complaints, repeated cord damage or frequent debris wrapping can point to a route, training, storage, consumable or equipment-fit problem even when each event appears minor.
Common Maintenance Mistakes
Using one checklist for every model
A common front page is useful, but the procedures, intervals and battery fields must match the asset. Add model-specific controlled pages instead of hiding differences in operator memory.
Treating maintenance-free as inspection-free
Sealed batteries still need correct charging, cleanliness and visible-condition checks. The machine still needs tanks, brushes, pads, squeegees, filters and records.
Cleaning without inspecting
A clean component can still be cut, worn, loose or deformed. Record condition as well as task completion.
Recording only completed work
The most valuable entry may be the defect that stopped the machine. Include abnormal condition, status, owner and release requirement.
Letting operators cross the service boundary
Removing an approved squeegee is not permission to open an electrical enclosure. The manual and training determine the boundary.
Closing a work order without a release test
The repaired machine should pass the relevant functional check and, when needed, a controlled floor test. Record who returned it to service.
Frequently Asked Questions
What maintenance should be done on a floor scrubber every day?
Before use, check the exterior, leaks, safety devices, cleaning components, squeegee, recovery readiness, battery indication and visible cords or connectors. After use, drain and clean the assigned tanks and recovery parts, clean brushes or pads and the squeegee, record wear, charge correctly and store the machine as its manual requires.
What belongs on a weekly floor scrubber checklist?
Use the model manual. Common review areas include blade and brush wear, visible hoses and seals, filters or traps due that week, fasteners, charger and battery condition, recurring defects and upcoming service. Wet-battery electrolyte belongs only on checklists for batteries that require it.
How often should a floor scrubber be serviced?
At the hour, date, condition or service-indicator intervals in the exact machine, battery and charger documentation. Work severity can shorten an interval. Do not apply one model’s 50-hour or six-month schedule to another machine.
Should the recovery tank be cleaned after every use?
Many manufacturer schedules assign recovery-tank, debris-tray and float-screen cleaning after use. Follow the model procedure and approved wastewater process, then leave the machine in the prescribed storage condition.
Do maintenance-free floor scrubber batteries need maintenance?
They do not require watering when the manufacturer identifies them as sealed maintenance-free batteries. They still require correct charging, cleaning, external inspection and attention to cables, connectors, mounting and abnormal conditions.
Who should perform preventive maintenance?
Trained operators perform the tasks assigned to them. Supervisors control records, due work, isolation and resources. Qualified or authorized service personnel perform the scheduled, internal or extraordinary work identified by the manufacturer.
When should a floor scrubber be taken out of service?
Stop for unresolved leaks, failed safety or control functions, damaged charging or battery components, smoke, burning odor, abnormal heat, serious noise or vibration, repeated faults, unsafe loose components or a wet-floor result that cannot be safely corrected within the operator procedure.
Is this checklist a replacement for the operator manual?
No. It is a management template and minimum control layer. The exact operator, battery, charger and service documentation defines the machine-specific steps, parts, intervals and qualifications.
Final Takeaway
Maintain the decision system, not just the parts. Separate pre-shift readiness, end-of-shift cleaning, weekly condition review and manufacturer-scheduled service. Put an owner, record and disposition beside every task. The machine returns to work only when the checklist supports one clear result: continue use, correct before use, or stop and escalate.